
Signing an Image
Scenarios
You can use keys created in Data Encryption Workshop (DEW) to sign images. This will ensure image consistency during distribution and deployment and prevent man-in-the-middle (MITM) attacks or unauthorized image use and updates. An image can be automatically signed based on a policy after it is pushed. Before signing images, create an asymmetric key in Data Encryption Workshop (DEW). Then, create a signature rule, and set parameters. Images will be manually or automatically signed based on the rule.
Constraints
- Only clusters v1.23 and later are supported.
- Only key algorithms listed in Table 1 can be used.
- A repository can have a maximum of 100,000 image tags, and a maximum of 300 image tags can be signed per minute. After the verification add-on is installed, the signatures of a maximum of 300 image tags can be verified per minute.
Prerequisites
- You have purchased a registry.
- You have purchased a CCE cluster.
Creating an Asymmetric Key
- Log in to the DEW console.
- In the navigation pane, choose Key Management Service. Click Create Key in the upper right corner.
- In the displayed dialog box, configure the parameters and click OK.
Asymmetric key algorithms are required by image signatures. So, select an ECC or SM2 algorithm for Key Algorithm and SIGN_VERIFY for Usage. For details, see Table 1. Configure other parameters based on site requirements. For details, see Creating a Key.
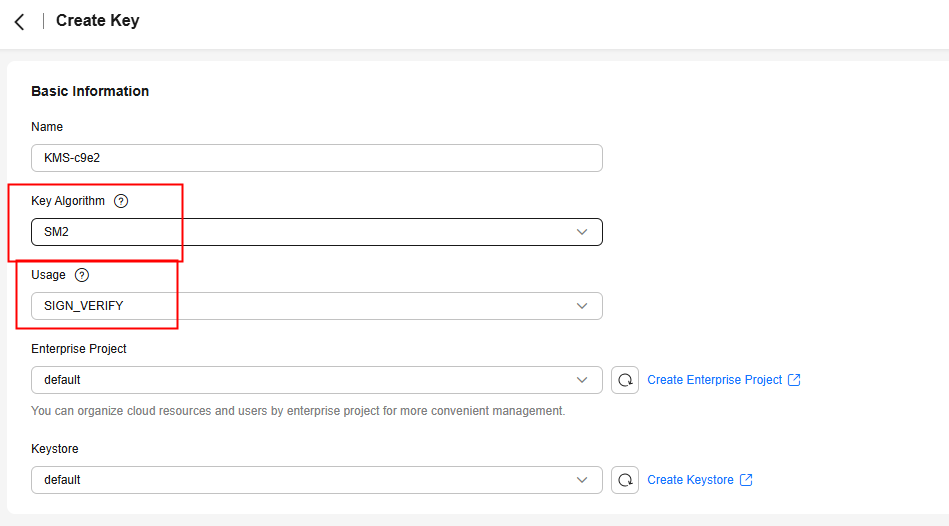
Table 1 Key algorithms supported by SWR Key
Algorithm
Specifications
Description
Used For
Asymmetric
ECC
- EC_P256
- ECDSA_SHA_256
- EC_P384
- ECDSA_SHA_384
NIST Elliptic Curve Cryptography (ECC)
Creating digital signatures
Asymmetric
SM2
SM2
SM2 asymmetric key
Encrypting and decrypting a small amount of data, or creating digital signatures
- EC_P256
Creating a Signing Policy
- Log in to the SWR Enterprise Edition console, switch to your region in the upper left corner of the page, and click the name of the target repository.
- In the navigation pane, choose Image Signature.
- In the upper right corner, click Create Signing Policy.
- Configure the parameters.
Table 2 Parameter description Parameter
Description
Example
Name
Policy name.
Enter 1 to 256 characters. Only letters, digits, underscores (_), and hyphens (-) are allowed.
SignatureRule
Namespace
Select the namespace where the image is.
library
Application Scope
Image: Image name. By default, a regular expression is used to match images. Alternatively, you can click
 to select images.
The regular expression can be nginx-* or {repo1, repo2}.
- *: matches any field that does not contain the path separator /.
- **: matches any field that contains the path separator /.
- ?: matches any single character except /.
- {option 1, option 2, ...}: matches any of the options. The matching is successful if one of the options is matched.
Version: Image tag. A regular expression is used.
nginx-*: matches images starting with nginx-.
Signing Method
Select KMS.
KMS
Signature Key
Select the key created in Creating an Asymmetric Key. Note the following:
- If the algorithm is not supported, it cannot be selected.
- If the key usage is not SIGN_VERIFY, the key cannot be selected.
- If the key status is not Enabled, the key cannot be selected.
key1
Trigger Mode
- Manual: You need to manually trigger image signing.
- Event + manual: When a new image is pushed to a repository and the image matches the regular expression, image signing will be triggered.
Event + manual
Description
Enter a description for the policy.
-
Figure 1 Creating a signing policy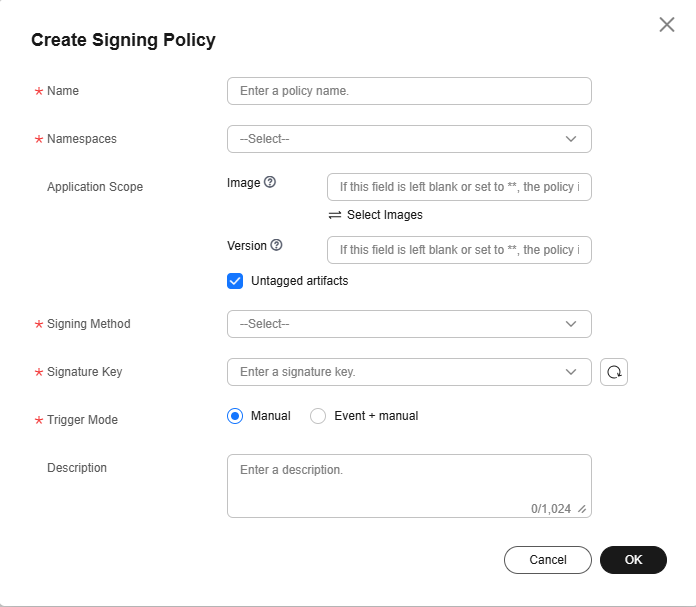
- Click OK.
Verifying Image Signing
Log in to the SWR Enterprise Edition console, switch to your region in the upper left corner of the page, and click the name of the target repository. In the navigation pane, choose Image Signing. On the displayed page, create a signing policy and execute it. After the execution is successful, go to the Image Repositories page and then check the signed image. The attachment in the Artifacts area is the signature file of the image.

If Block Images with Potential Vulnerabilities is enabled, images that contain vulnerabilities with the selected severity or a higher severity do not support image signing. For details about images with potential vulnerabilities and their download blocking conditions, see Blocking Images with Potential Vulnerabilities in Table 1.
Feedback
Was this page helpful?
Provide feedbackThank you very much for your feedback. We will continue working to improve the documentation.See the reply and handling status in My Cloud VOC.
For any further questions, feel free to contact us through the chatbot.
Chatbot


